How to Unstuck SORA→ETHEREUM Transactions
INFO
This guide is written by the community member "Frasier Man" and reviewed by the SORA team. If you want to thank Fraiser man, please donate to: 5D4pKyFNRjU8yoYKgiH1UqrjzayjCkttt82HsAdwQ6FTsQyv
When to Use This Guide:
- Your SORA bridge transaction is stuck on pending or has failed.
- The "retry" command on the bridge UI is not working/not available.
- Your funds have left your SORA account and not arrived in your Ethereum account after some time.
Overview of the Steps in this Guide
Step 1 Check if your bridge transaction is actually stuck or is just pending.
Step 2 Find the transaction hash for your stuck transaction.
Step 3 Get the data needed to unstuck the transaction (getting your proof).
Step 4 Use your proof to manually call your Ethereum transaction to receive your tokens.
INFO
Step 4 is slightly different for each token so make sure to follow the correct subsection.**
INFO
If at the end of Step 4, Ethereum asks you for a LARGE transaction fee, DO NOT CONFIRM THE TRANSACTION. It means data has been entered incorrectly, double check your input.
Step 1
Check if your transaction is actually stuck or just pending.
Connect to Polkadot.js app: https://polkadot.js.org/apps/rpc=wss%3A%2F%2Fws.sora2.soramitsu.co.jp#/rpc
Click "Developer", then Select "RPC calls":
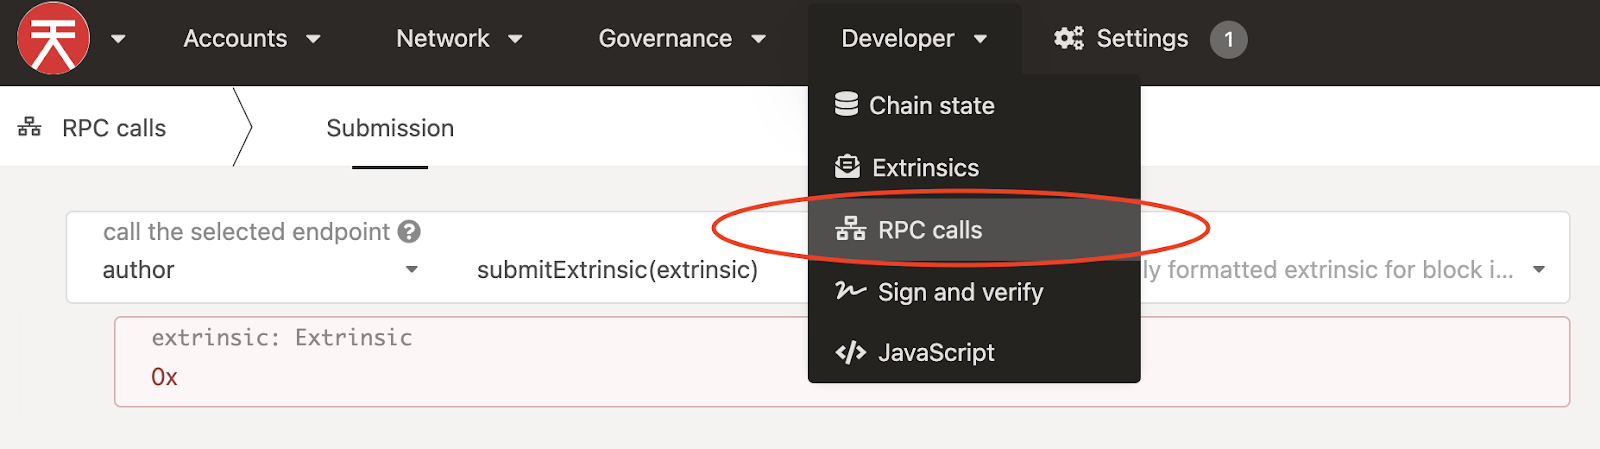
Click “author”, then Select “Ethbridge”. By default “getAccountRequests(accountId, statusFilter)” should be selected, if not, select it.
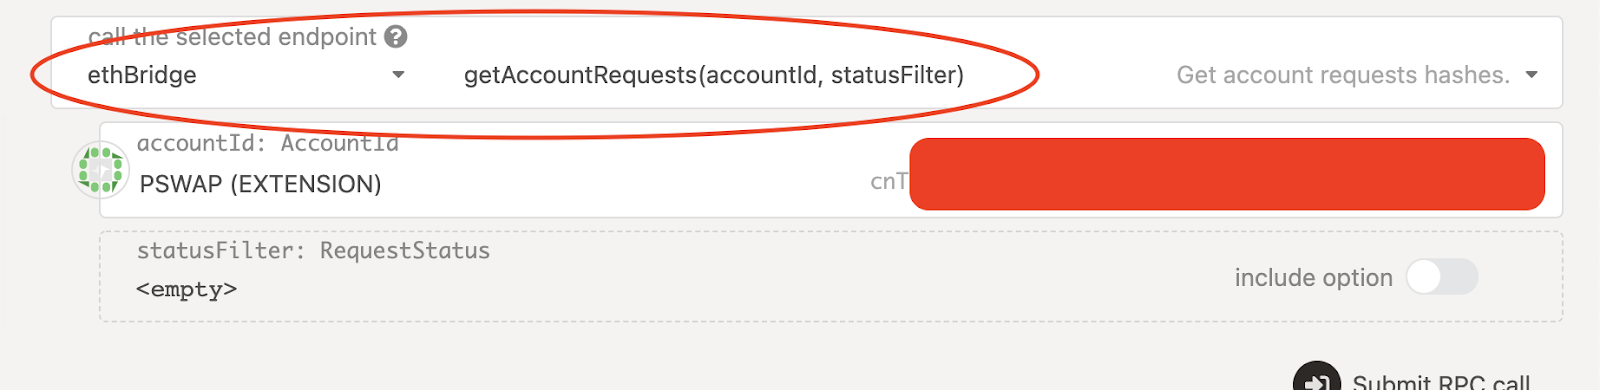
Ensure your account is selected underneath, click on "include option" and choose "Pending", then Submit RPC call
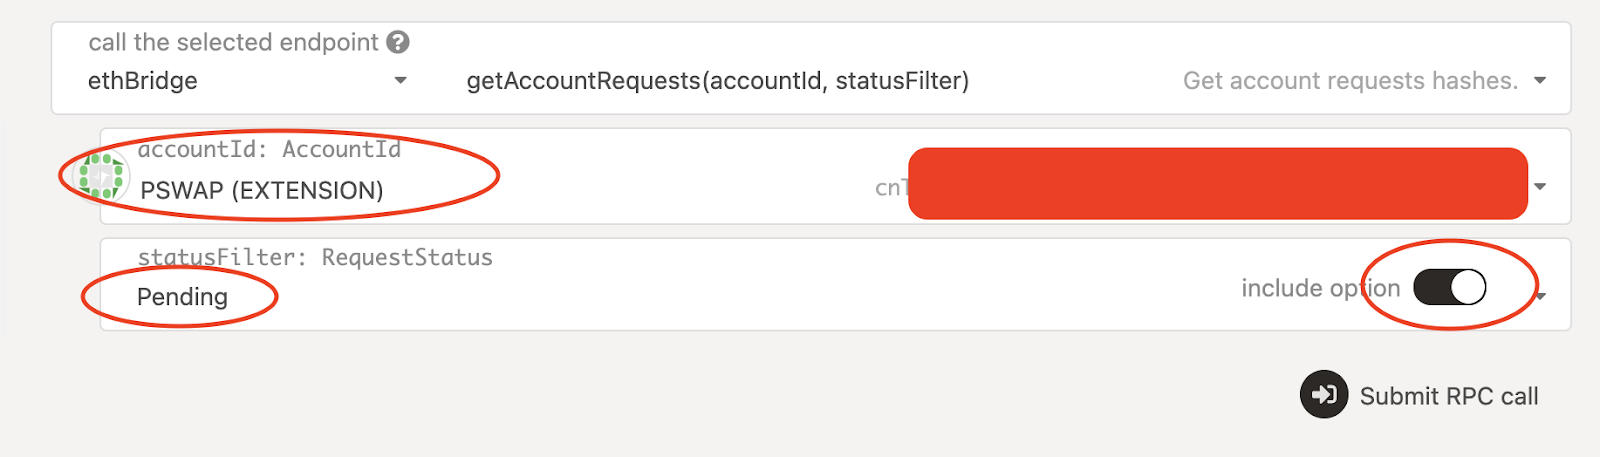
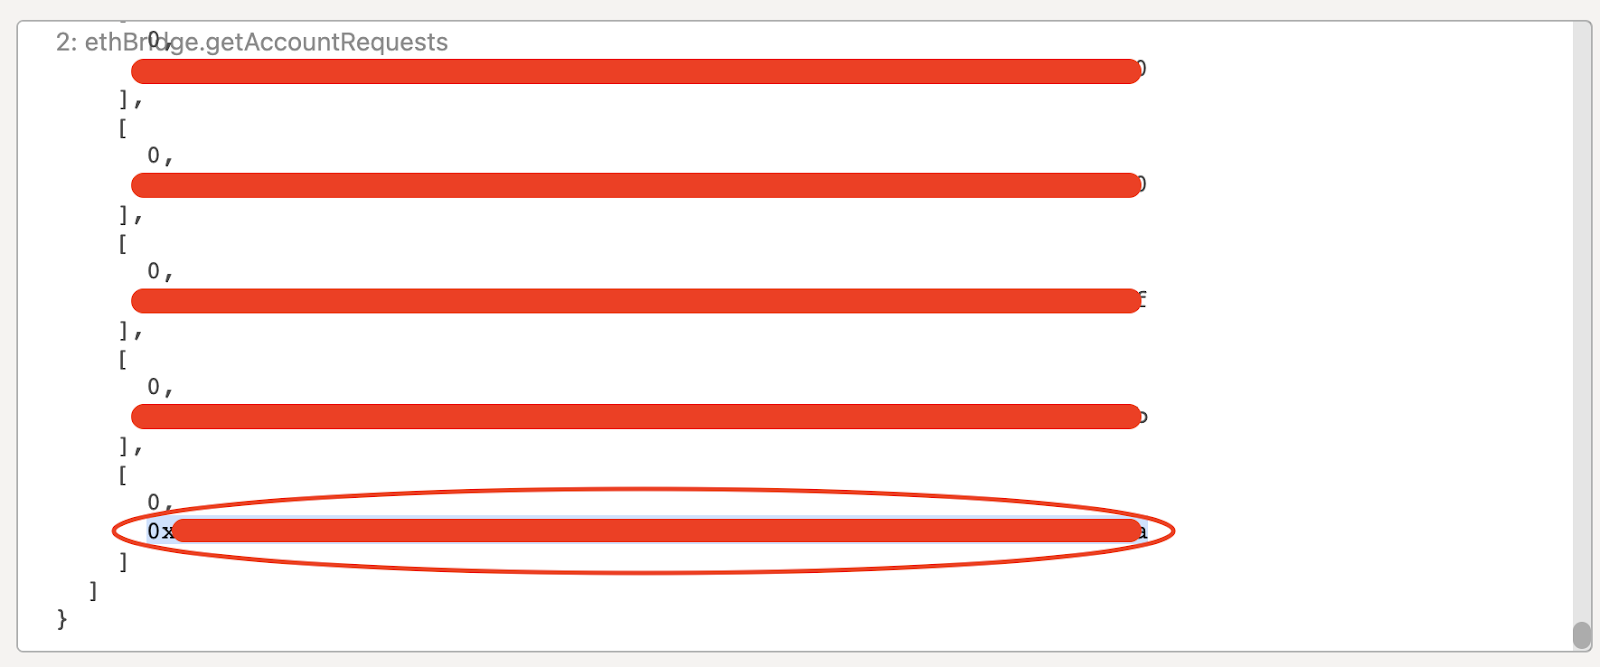
If your result contains any transaction hashes, these ARE still pending and may take some time to go through. If your result looks as below and produces no hashes, then your SORA bridge transaction has been approved and you should continue through the guide to unstuck your transaction.
Step 2
Find the transaction hash of your approved (but stuck) transaction.
- If continuing from step 1, your RPC call only needs slight adjusting. Click on “include option” but this time select “Approvals Ready”, then Submit RPC Call
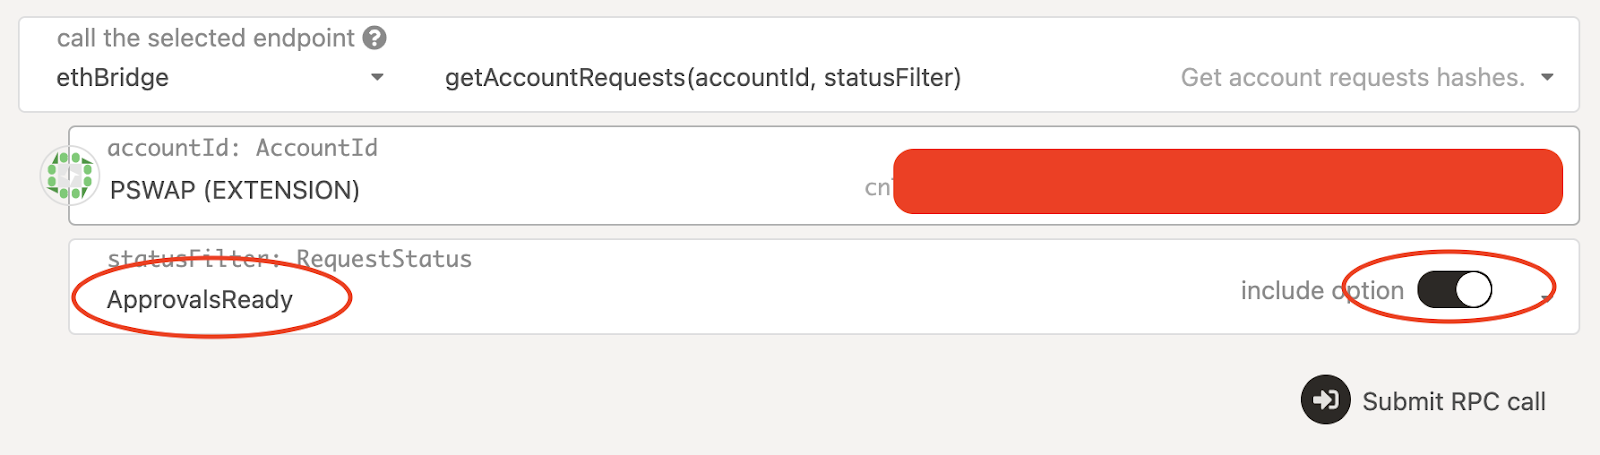
The result is a list of all SORA bridge transactions that have been approved on the SORA side. Your latest bridge transaction is the last one (scroll down if necessary). If you have made more SORA>ETH bridge transactions after the stuck one, you will need to go from the bottom to the top of the list until you find your stuck transaction.
- Copy your “stuck” transaction hash, it will look like this:
0x57533dc46a5d257b6dj0nhagb0f8s4dfedfl6cpppcoaidu99dd0sdc4def4g6b
Step 3
Use your transaction hash to get the required data (proof) for step 4.
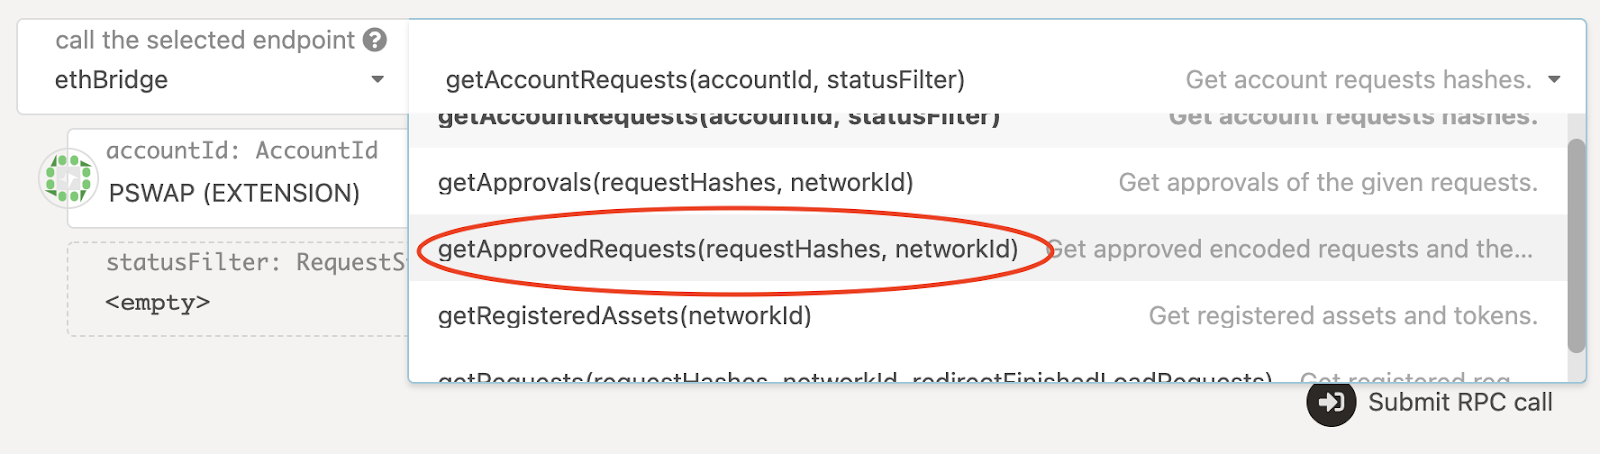
- Continuing from step 2, click on “getAccountRequests(accountId, statusFilter)” and change it to “getApprovedRequests(requestHashes, networkId)
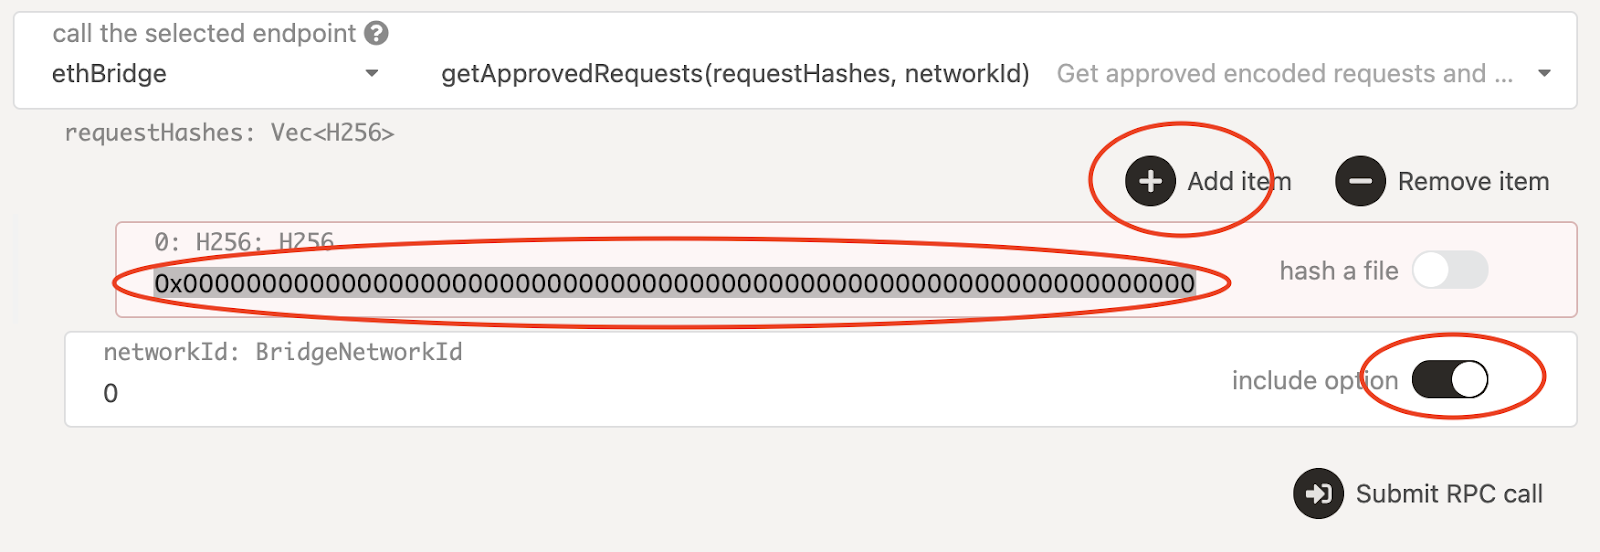
- Click on “Add item”.
- Paste in your Approved transaction hash from step 2 instead of 0x000…
- Click “Include Option” and leave the network id as 0.
- Submit the RPC Call:
The result is your “Proof”, it contains all the data needed for step 4.
Expand to see an example of proof
Transfer: {

currency_id: {

TokenAddress: 0x6b175474e89094c44da98b954eedeac495271d0f

},

amount: 30,000,000,000,000,000,000,000,

to: 0xd7230339a4b355ae6d24a7378cc910o85l34k5nb,

from: 0x6ef01fd3b42ed7a3fa0e7ca366d0a464dc71016d,

tx_hash: 0x235517c869f0288ad8jjhag6f0de0jbkelf6ooi5ycct5g9d945d73d40d987y6b,

network_id: 0x0000000000000000000000000000000000000000000000000000000000000000,

raw: 0x6b175474e89094c44da98b954eedeac495271d0f00000000000000000000000000000000000000000000069c1d44c523e2f80000d7330339a1b395ae5d24ab376cc610085034458c6
{

r: 0x7a42sefc5dh232j34g61d22c53b28cn9600f4jhggf70fdfeh83kb4l7d9s2bcea,

s: 0x79b1e77bb20663953981d267fbc01d53f9cc3x34s63aa7h3f4385l04td9be9c43,

*v: 0

},

{

r: 0xcc9fcee0fd50bfa29ekb10ldlkjh3tdef02f9beb74a1v295ac0c5x01253f8f8f,

s: 0xkafvd79ffa27g10h928jb88066e8252dec3d58fb6ebf0862c6839d880f858a8f,

v:
Here's the guide on how yuo should prepare your data for the next step.
TIP
You will be copying and pasting data from your proof. The first time you do this, it's easier if you first copy and paste the whole proof into a notepad, and edit the results as described below, ready to use into step 4.
| Field | Description | Example |
|---|---|---|
| Token Address | This can be copied and pasted as it is, no commas or spaces. | 0x6b175474e89094c44da98b954eedeac495271d0f |
| Amount | Copy and paste this number and delete all the commas. (this amount will reflect the amount you bridged but will be a much larger number, for example the amount in this example bridge was actually 30000) | 30000000000000000000000 |
| To | This can be copied and pasted as it is, no commas or spaces. NOTE - This is the Ethereum address that was connected to the bridge when the transaction was made, it must be the same address used when connecting in Step 4. | 0xd7230339a4b355ae6d24a7378cc910o85l34k5nb |
| From | This can be copied and pasted as it is, no commas or spaces. | 0x6ef01fd3b42ed7a3fa0e7ca366d0a464dc71016d |
| Transaction Hash | This can be copied and pasted as it is, no commas or spaces. | 0x235517c869f0288ad8jjhag6f0de0jbkelf6ooi5ycct5g9d945d73d40d987y6b |
The following (R, S and V) have two numbers, the top number and the bottom number, they must be put into an array, this means putting the data into squared brackets, separated with a comma, top number first and bottom number second.
| Field | Description | Example |
|---|---|---|
| R | Start with an open square bracket, then paste in the top “R”, then type a comma and paste in the bottom “R”, then end with a closed square bracket. | [0x7a42sefc5dh232j34g61d22c53b28cn9600f4jhggf70fdfeh83kb4l7d9s2bcea,0xcc9fcee0fd50bfa29ekb10ldlkjh3tdef02f9beb74a1v295ac0c5x01253f8f8f] |
Make sure there are no spaces in the array, double check after the comma that there is no space.
| Field | Description | Example |
|---|---|---|
| S | Same as R but use the top “S” and bottom “S” | [0x79b1e77bb20663953981d267fbc01d53f9cc3x34s63aa7h3f4385l04td9be9c43,0xkafvd79ffa27g10h928jb88066e8252dec3d58fb6ebf0862c6839d880f858a8f] |
| V | The format of V must also be put into an array, there are two versions, one is for unstucking XOR and the other is for all other tokens. For all tokens except XOR | If your v = 0 then you must put 27 into the array If yourv = 1 then you must put 28 into the array. For our example, top v is0 and bottom v is 1so our array would be [27,28] |
| V | For XOR | If v = 0 then you must put 0x1b into the array, If v = 1 then you must put 0x1c into the array. For our example, top v is 0 and bottom v is 1 so our array would be [0x1b,0x1c] |
- Result from Proof
You now have everything you need for step 4, from our example proof we have the following, yours will look similar to this.
0x6b175474e89094c44da98b954eedeac495271d0f

30000000000000000000000

0xd7230339a4b355ae6d24a7378cc910o85l34k5nb

0x6ef01fd3b42ed7a3fa0e7ca366d0a464dc71016d

0x235517c869f0288ad8jjhag6f0de0jbkelf6ooi5ycct5g9d945d73d40d987y6b

[0x7a42sefc5dh232j34g61d22c53b28cn9600f4jhggf70fdfeh83kb4l7d9s2bcea,0xcc9fcee0fd50bfa29ekb10ldlkjh3tdef02f9beb74a1v295ac0c5x01253f8f8f]

[0x79b1e77bb20663953981d267fbc01d53f9cc3x34s63aa7h3f4385l04td9be9c43,0xkafvd79ffa27g10h928jb88066e8252dec3d58fb6ebf0862c6839d880f858a8f]

[27,28] (for all tokens except XOR) or [0x1b,0x1c] (for XOR)
Step 4
Use the data from your proof to call the ethereum transaction.
There are four different methods depending on the token you are unstucking, skip to the correct method and have your proof data ready to paste.
XOR
- Open https://web3playground.io/QmfPMVGCCSHYtk5Z6DYYzv5hZ1SDakpB3bwA5w9rDTPB9A.
- Your metamask will prompt you to connect, please ensure the correct wallet is selected.
- Enter your proof data into the top fields within the code. Note that for XOR you must only paste in the data itself, leave out the array brackets and commas as they are already in place in the code.
- There is an example proof already on the page, you must only replace the data, leaving the quotation marks in place.
Below is the sample data you will see when opening the link, please note you may have to scroll right to see the whole of the code, the green words (e.g. // Token address) are to let you know which data to paste in.
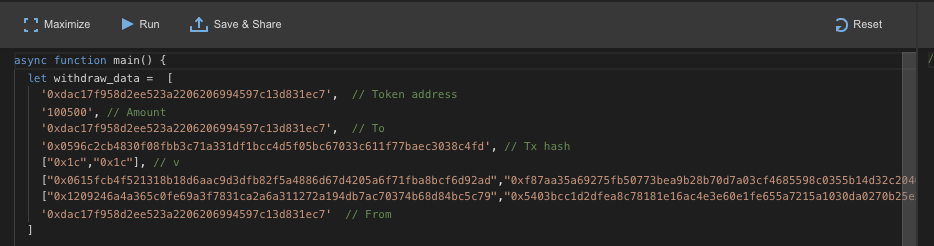
Below is our example proof from STEP 3 entered into the code, note how the quote characters must be left in place. This is how you must paste in your data.

- Click run, this should bring up your metamask for you to confirm. Remember if the gas price is over the top (hundreds of dollars), then some of the data is wrong. Once confirmed your XOR should arrive in your wallet. Please remember to add the token address to your wallet if necessary.
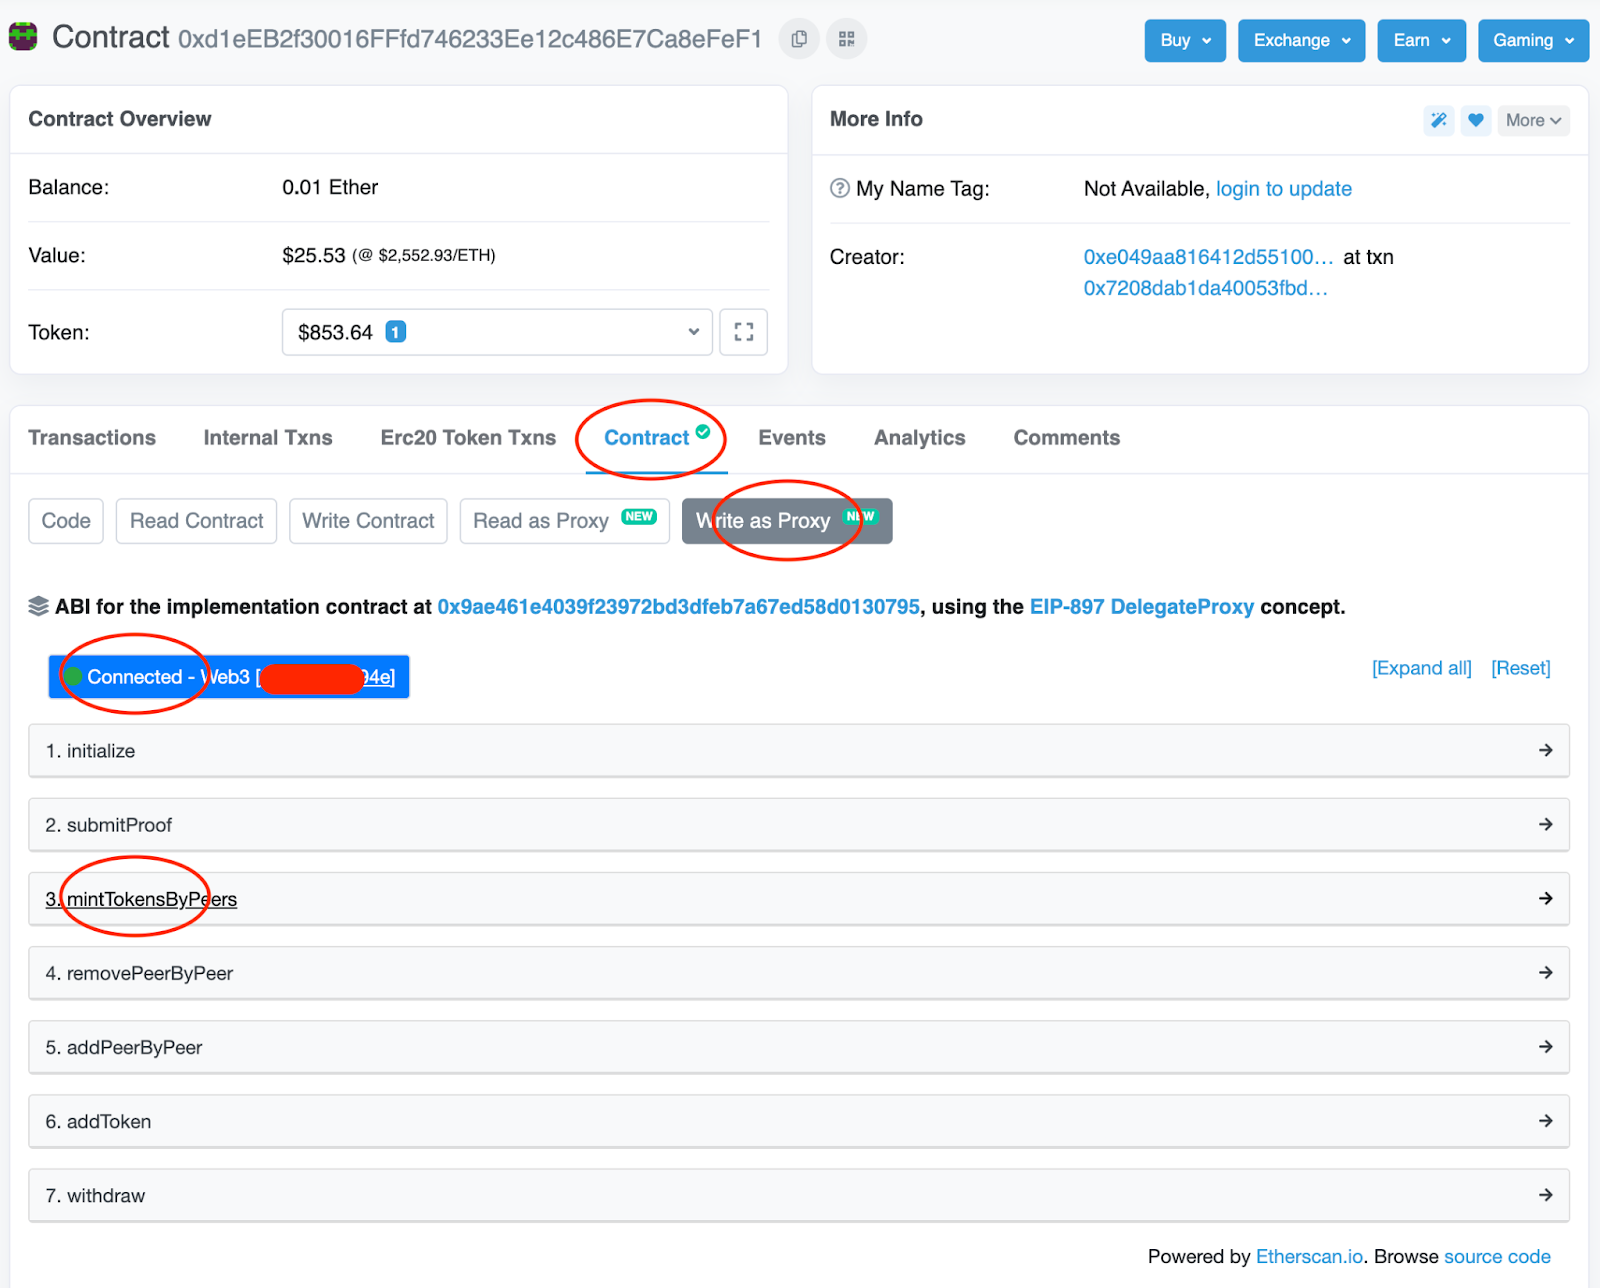
VAL
- Open https://etherscan.io/address/0xd1eeb2f30016fffd746233ee12c486e7ca8efef1
- Click “Contract”
- Click “Write as Proxy”
- Click “Connect Web 3”.
- Ensure you have your eth address and a green circle shown after connection.
- Click “mintTokensByPeers”
- Enter your proof data into the fields as below, this is using our example proof from Step 3, This is how you must paste in your data. (note: beneficiary = to)

- Click "write", this should bring up your metamask for you to confirm. Remember if the gas price is over the top (hundreds of dollars), then some of the data is wrong. Once confirmed your VAL should arrive in your wallet. Please remember to add the token address to your wallet if necessary.
PSWAP & CERES
- Open https://etherscan.io/address/0x313416870a4da6f12505a550b67bb73c8e21d5d3
- Click “Contract”
- Click “Write Contract”
- Click “Connect Web 3”
- Ensure you have your eth address and a green circle shown after connection
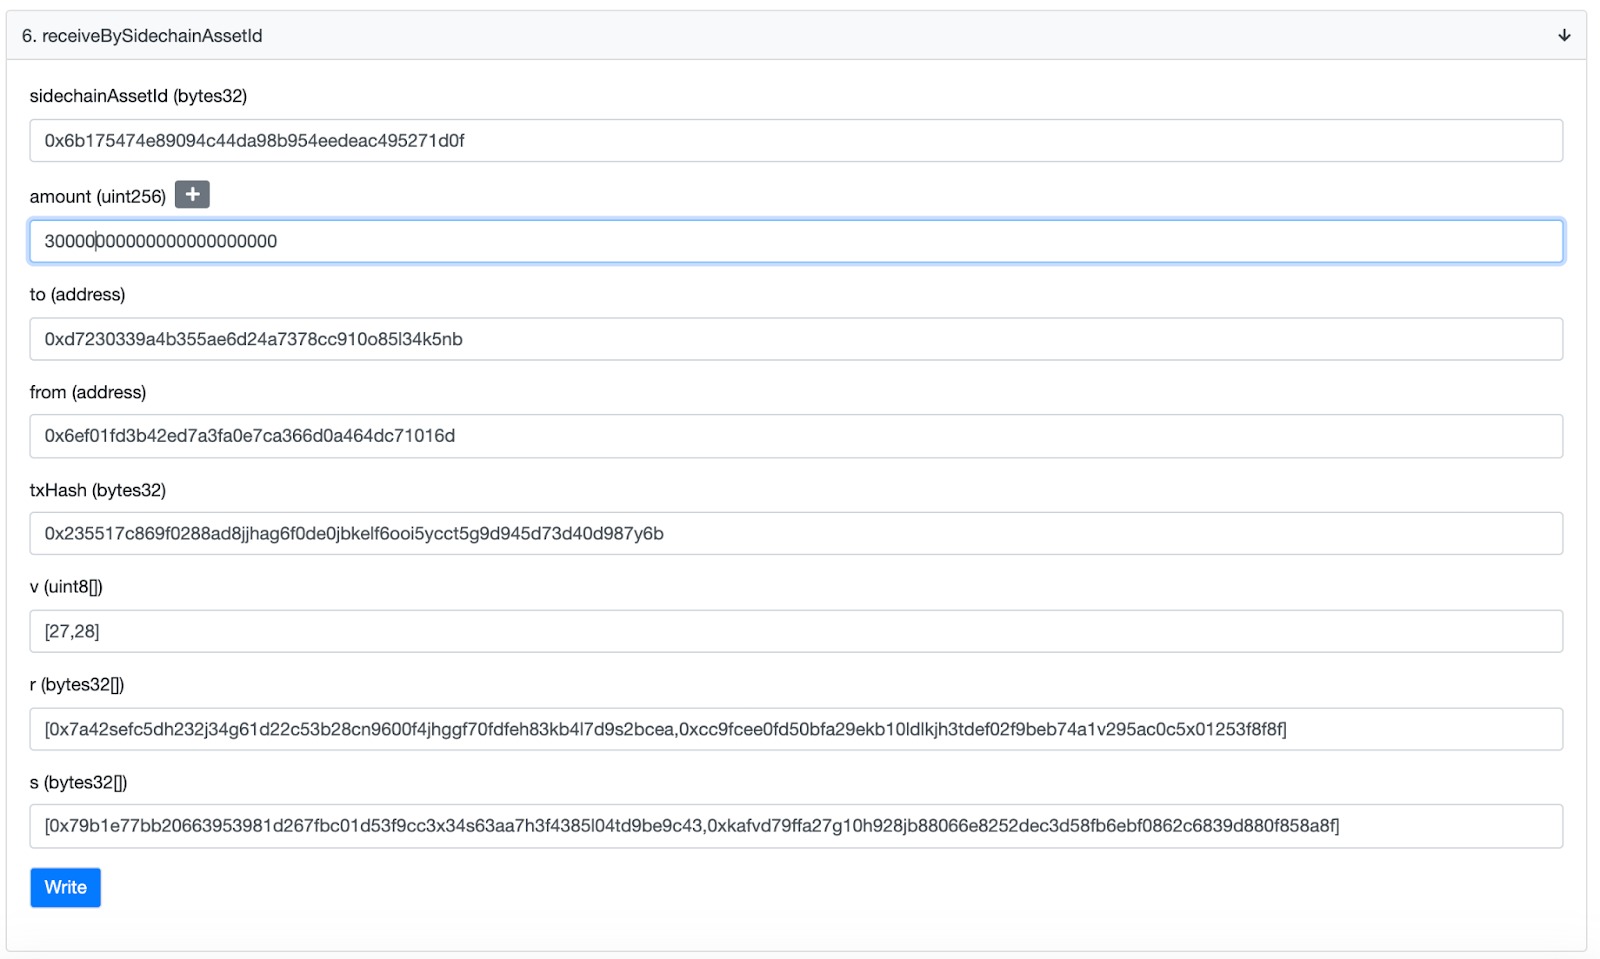
- Click “receiveBySidechainAssetID”
- Enter your proof data into the fields as below, this is using our example proof from Step 3. This is how you must paste in your data. (note: sideChainassetid = token address)
- Click "write", this should bring up your metamask for you to confirm. Remember if the gas price is over the top (hundreds of dollars), then some of the data is wrong. Once confirmed your PSWAP should arrive in your wallet. Please remember to add the token address to your wallet if necessary.
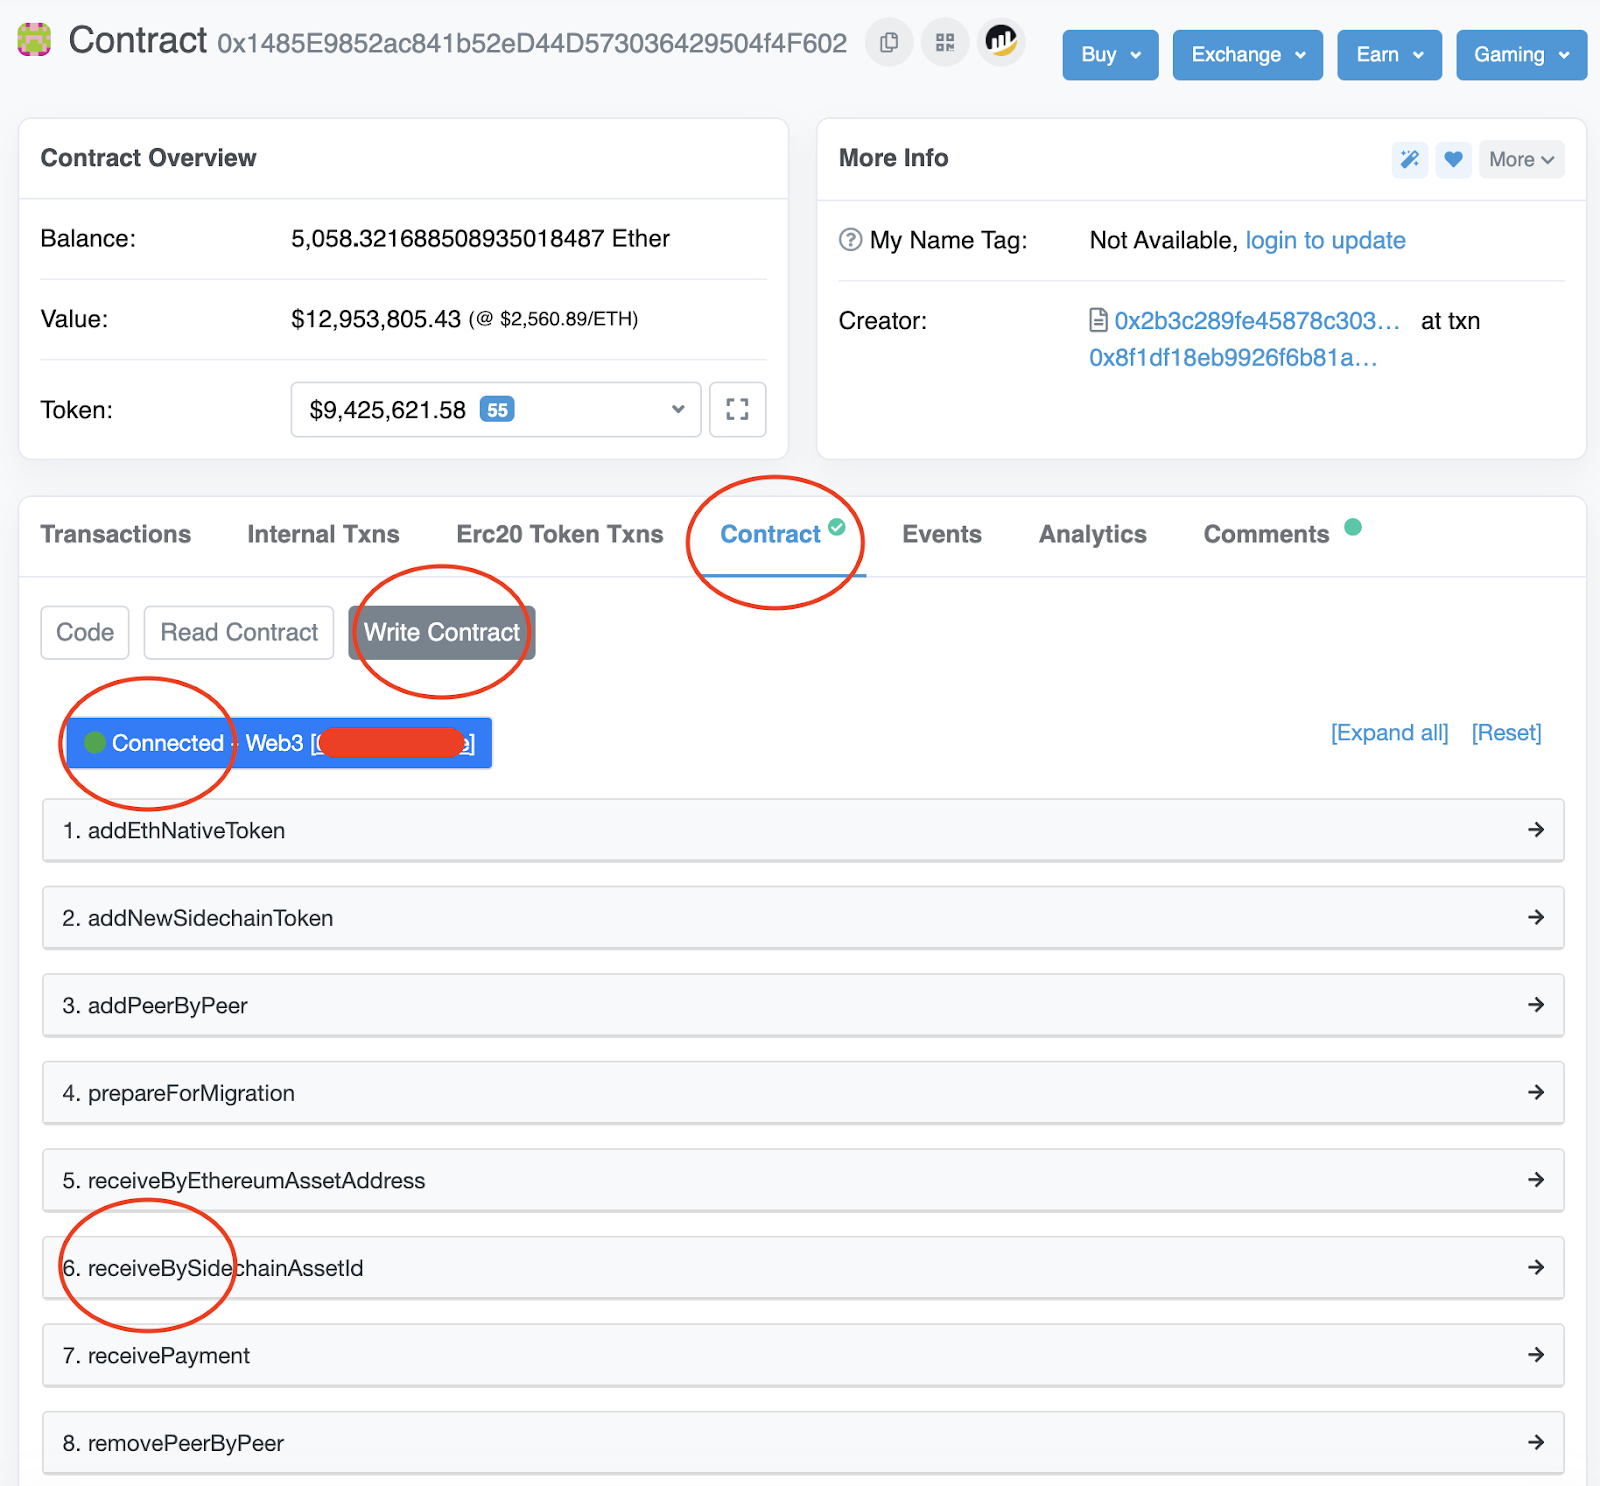
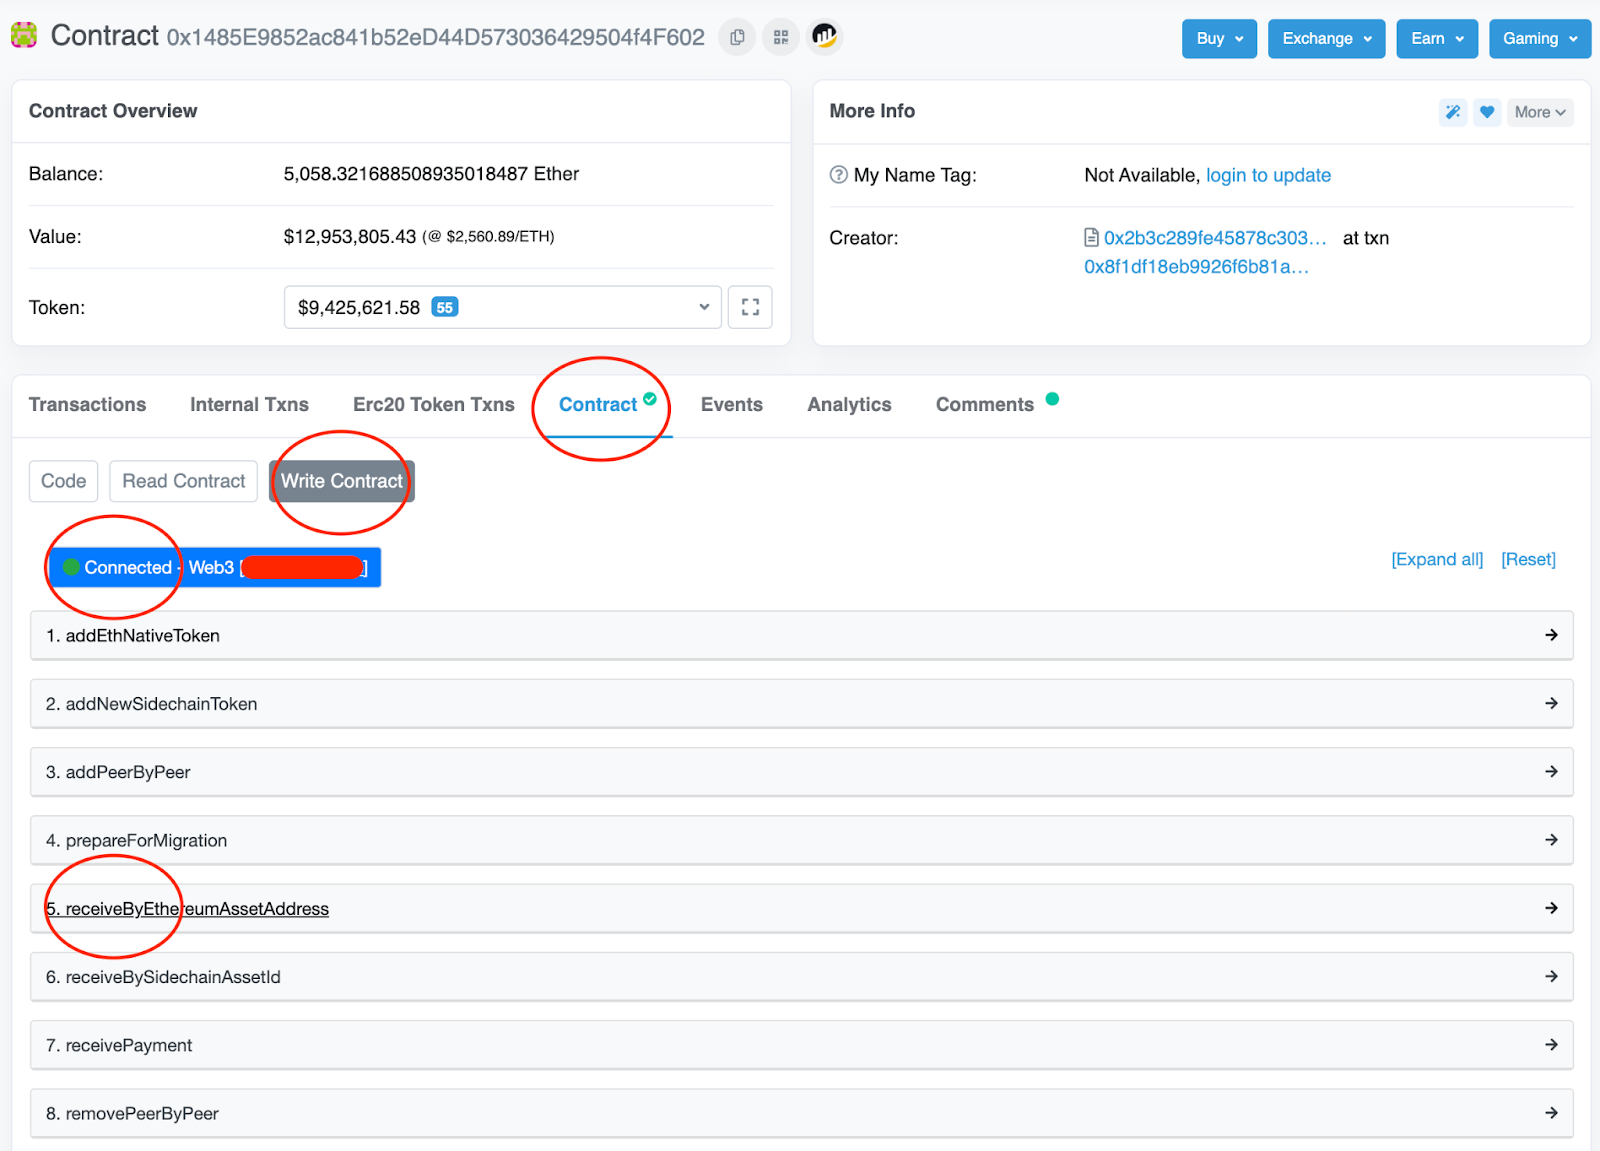
All Other ERC-20 Tokens (e.g. ETH, DAI, UNI etc.)
- Open https://etherscan.io/address/0x1485e9852ac841b52ed44d573036429504f4f602
- Click “Contract”
- Click “Write Contract”
- Click “Connect Web 3”
- Ensure you have your eth address and a green circle after connection
- Click “receiveByEthereumAssetAddress”
- Enter your proof data into the fields as below, this is using our example proof from Step 3. This is how you must paste in your data.
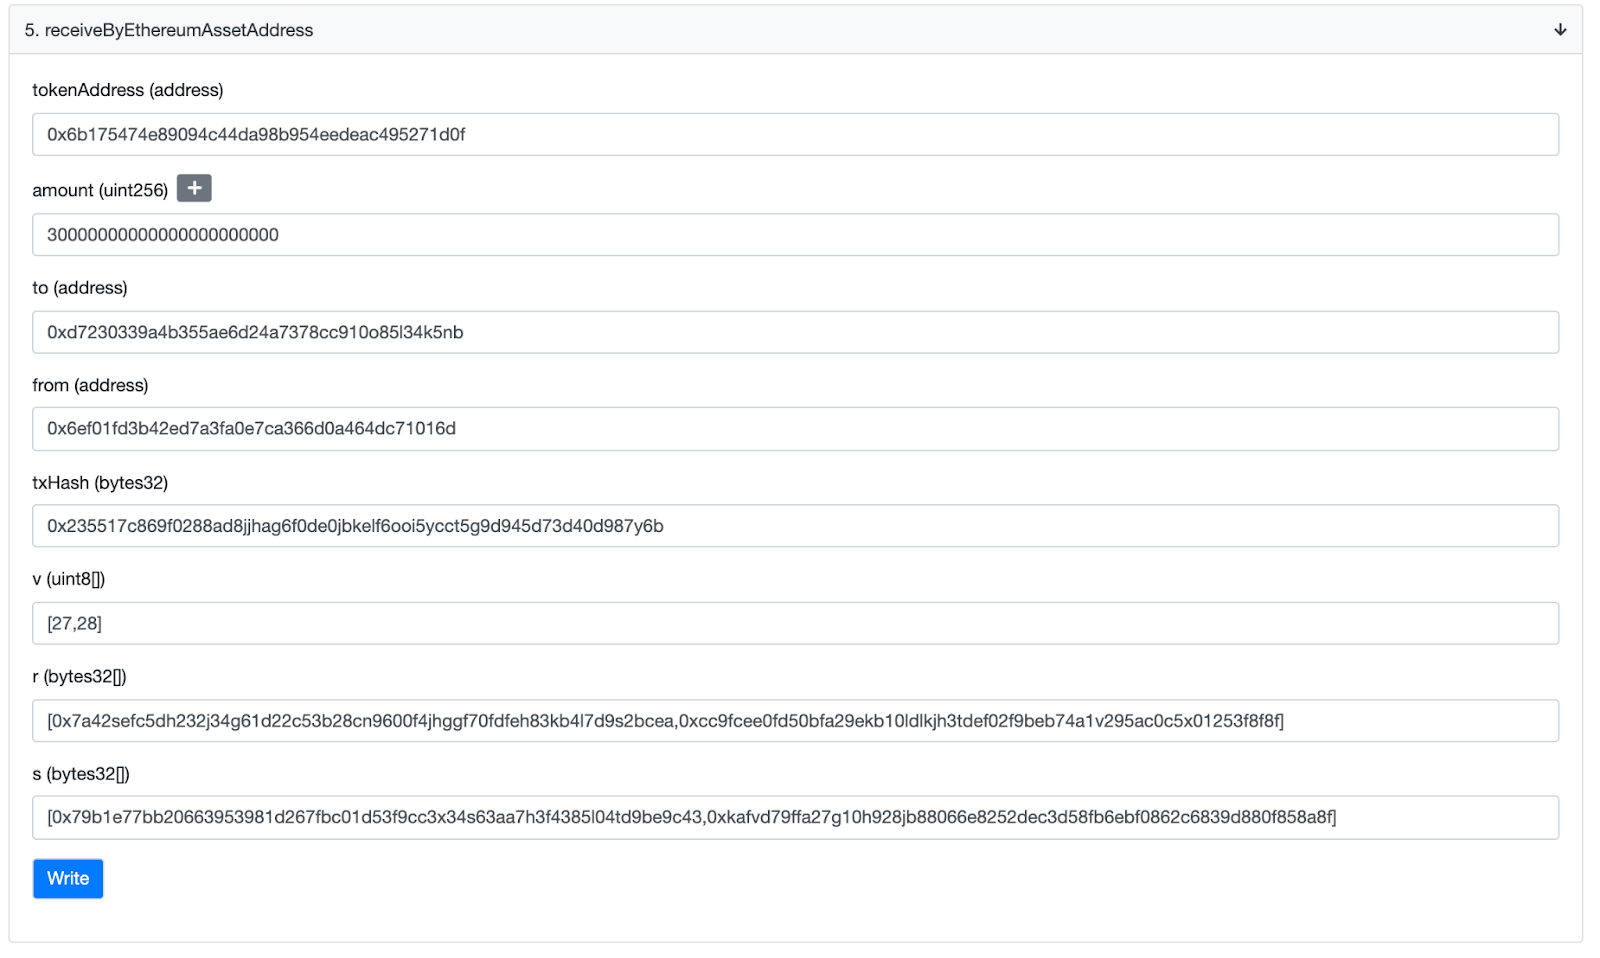
- Click "write", this should bring up your metamask for you to confirm. Remember if the gas price is over the top (100s of $) then some of the data is wrong. Once confirmed your tokens should arrive in your wallet. Please remember to add the token address to your wallet if necessary.