How to Run a SORA Mainnet Node
TL;DR
- Anyone can run a node on the SORA mainnet
- There are two types of nodes:
- Syncing nodes that just receive and relay data
- Validating nodes that make the blocks. Read more in Consensus.
Prerequisites
You will need:
- A machine with Linux, Windows, or macOS
- Docker (preferably the latest version). Follow the installation guide for your operating system.
- At least 8GB RAM, preferably 16GB RAM. For production, you will need 64GB RAM.
- 300GB free space (preferably SSD, with the ability to expand)
- Intel(R) Core(TM) i7–7700K CPU @ 4.20GHz (alternatively, a 4-Core processor with a frequency of 2.2 GHz)
To check that Docker is installed, run the docker --version command in terminal. You will get an output like this:
Docker version 20.10.2, build 2291f61Check the container with the docker run hello-world command in terminal. If everything works fine, Docker will pull the hello-world image and run it.
Expand to see the docker run hello-world output
C:\\Users\\Pg> docker run hello-world
Unable to find image 'hello-world:latest' locally
latest: Pulling from library/hello-world
0e03bdcc26d7: Pull complete
Digest: sha256:95ddb6c31407e84e91a986b004aee40975cb0bda14b5949f6faac5d2deadb4b9
Status: Downloaded newer image for hello-world:latest

Hello from Docker!
This message shows that your installation appears to be working correctly.

To generate this message, Docker took the following steps:
 1. The Docker client contacted the Docker daemon.
 2. The Docker daemon pulled the "hello-world" image from the Docker Hub.
    (amd64)
 3. The Docker daemon created a new container from that image which runs the
    executable that produces the output you are currently reading.
 4. The Docker daemon streamed that output to the Docker client, which
 sent it to your terminal.

To try something more ambitious, you can run an Ubuntu container with:
 $ docker run -it ubuntu bash

Share images, automate workflows, and more with a free Docker ID:
<https://hub.docker.com/>

For more examples and ideas, visit:
<https://docs.docker.com/get-started/>
If something went wrong, please visit the Docker documentation. You can also download Docker from here:
Get the latest SORA Node version number
Users should use version 4.7.0 for the time being. We will update this article with the latest version after every update.
You should use the latest SORA Node version in order to run a node. You can see the latest build number here, and find the last version with thex.y.z format.
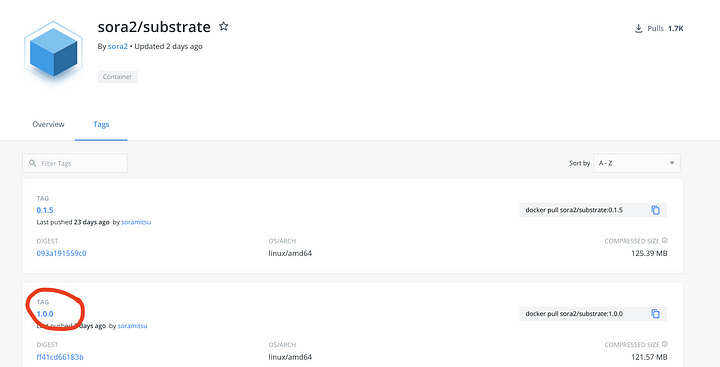
Use this version number for further docker commands in this guide. The number of the version will be marked as <version> in the commands. Please note that you would need to enter the version number without the brackets.
Running a Syncing Node
On Linux/Mac
Pull the docker image from the docker repository:
bashdocker pull sora2/substrate:4.7.0Create a folder for the node configuration:
bashmkdir sora2 cd sora2Grant access to the folder:
bashchown 10000:10000 `pwd`WARNING
On macOS you might need to use this instead:
bashsudo chown <username>:1000Run the docker image (don’t forget to insert your version below!)
bashdocker run --rm -p 127.0.0.1:9933:9933 -p 127.0.0.1:9944:9944 -v `pwd`:/chain sora2/substrate:4.7.0 --name sora2-node --chain main --base-path /chain --unsafe-ws-external --unsafe-rpc-external --wasm-execution compiled
On Windows
Pull the docker image from the docker repository:
bashdocker pull sora2/substrate:4.7.0Create a folder for the node configuration:
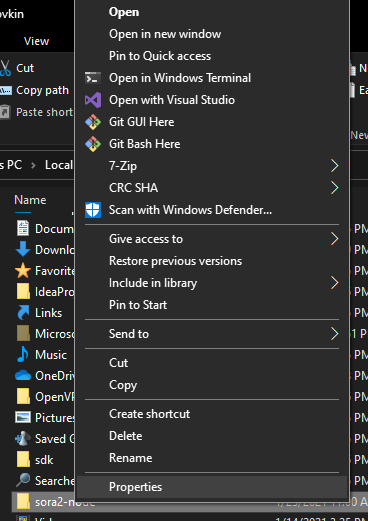
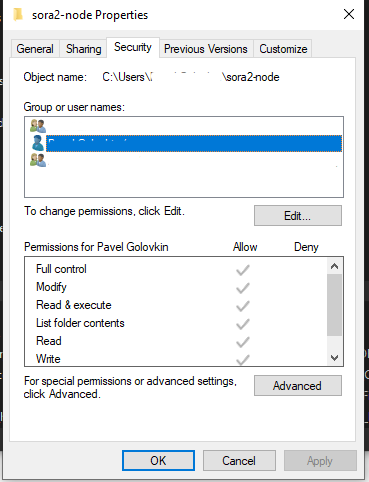
txtC:\\Users\\<username>\\sora2-nodeCheck access to the created folder:
All checkboxes should be activated for the user:
Run the docker command:
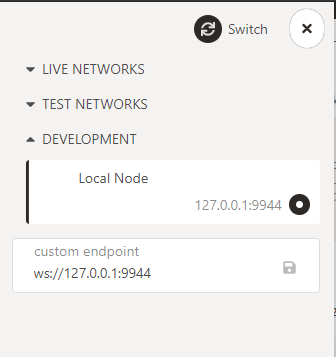
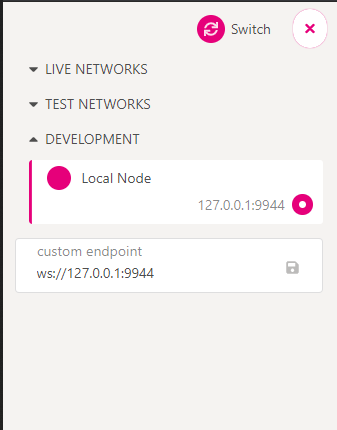
bashdocker run --rm -p 127.0.0.1:9933:9933 -p 127.0.0.1:9944:9944 -v sora2-node:/chain -u 0 sora2/substrate:4.7.0 --name sora2-node --chain main --base-path /chain --unsafe-ws-external --unsafe-rpc-external --wasm-execution compiledNow you can connect to your node with polkadot.js apps. Select Local node and click Switch.
Now your node should sync!
Running a Validator Node
On Linux/Mac
Pull the docker image from the docker repository:
bashdocker pull sora2/substrate:4.7.0Create a folder for the node configuration
bashmkdir sora2 cd sora2Grant access to the created folder:
bashchown 10000:10000 `pwd`WARNING
On macOS you might need to use this instead:
bashsudo chown <username>:1000Run the Docker command:
docker run --rm -p 127.0.0.1:9933:9933 -p 127.0.0.1:9944:9944 -v `pwd`:/chain sora2/substrate:4.7.0 --name sora2-node --chain main --base-path /chain --validator --rpc-methods Unsafe --rpc-cors all --execution Wasm --wasm-execution compiledYou can add the following flag to enable Telemetry for your node
--telemetry-url "wss://telemetry.polkadot.io/submit/ 0"
On Windows
Pull the docker image from the docker repository
docker pull sora2/substrate:4.7.0Create a folder for the node configuration
C:\\Users\\<username>\\sora2-nodeCheck the access to the folder:
All checkboxes should be activated for the user:
Run the Docker command
docker run --rm -p 127.0.0.1:9933:9933 -p 127.0.0.1:9944:9944 -v `pwd`:/chain sora2/substrate:4.7.0 --name sora2-node --chain main --base-path /chain --validator --rpc-methods Unsafe --rpc-cors all --execution Wasm --wasm-execution compiled
Get session keys
INFO
It is recommended to use the command line to get the session keys, as Polkadot.JS sometimes has trouble connecting to the local node.
With polkadot.js app
Open polkadot.js apps and switch to your local node.
In the Development section, select Local Node (ws://127.0.0.1:9944) and click Switch.
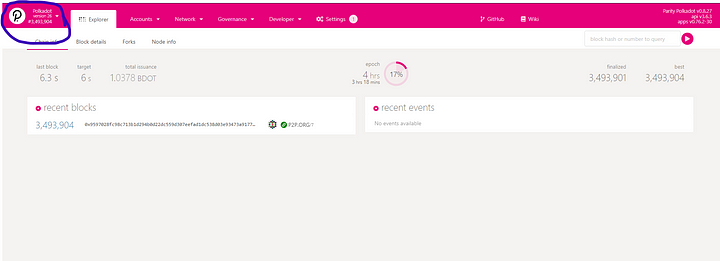
Now you’re able to see the screen with your node information. (Once your node has fully synced)

Navigate to Developer → RPC calls:

Select author → rotateKeys():

Click the Submit RPC call button:

Copy the session key from the output. You wll need the key later.
With command line
Open the terminal (or other command line client) and run the command
curl -H “Content-Type: application/json” -d ‘{“id”:1, “jsonrpc”:”2.0", “method”: “author_rotateKeys”, “params”:[]}’ http://localhost:9933The output will contain the session key:
json{“jsonrpc”:”2.0",”result”:”0x5e977ddcc0c69a6aed067052d5bd8f6bd365fae03562fd447d434e9814ac415d7c9ffe722364922bda314e44654f5c0cdc00d152470d5433f12cb73d078061863ac769d5f17b5460f042d221edf0099d2ce4c23edbe96ac943452cc4d3ad6d72”,”id”:1}Copy the result, in the current example it is
0x5e977ddcc0c69a6aed067052d5bd8f6bd365fae03562fd447d434e9814ac415d7c9ffe722364922bda314e44654f5c0cdc00d152470d5433f12cb73d078061863ac769d5f17b5460f042d221edf0099d2ce4c23edbe96ac943452cc4d3ad6d72.
Adding a Validator
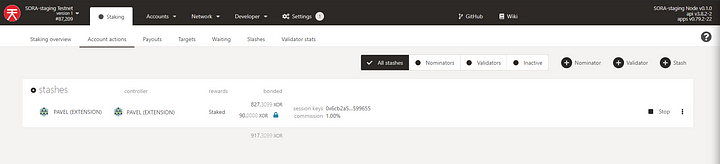
First, you should go to Accounts and already have an account connected. Navigate to Network → Staking → Account actions, and click Validator:
Select stash and controller account. It’s recommended to use different accounts for stash and controller. (In the example we are using PAVEL (EXTENSION))
Set the bonded value:
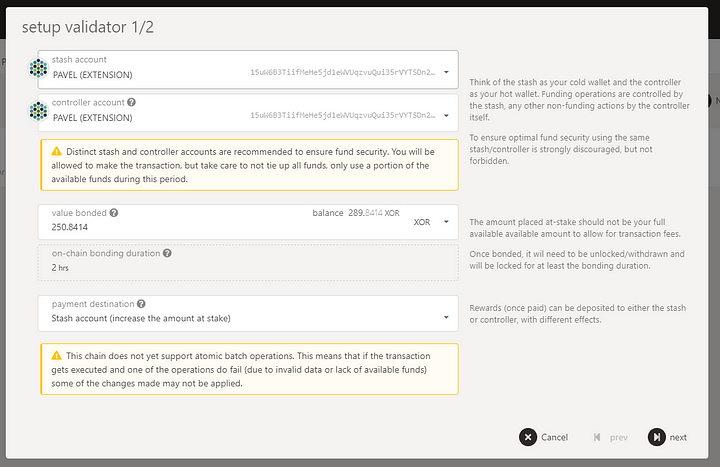
Set the session key (the result of rotateKeys call) and reward commission:
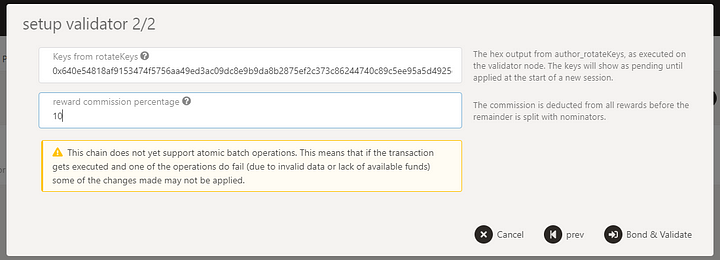
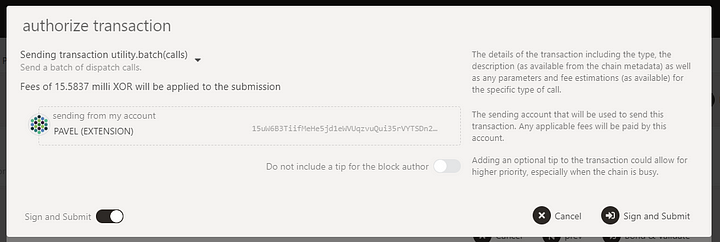
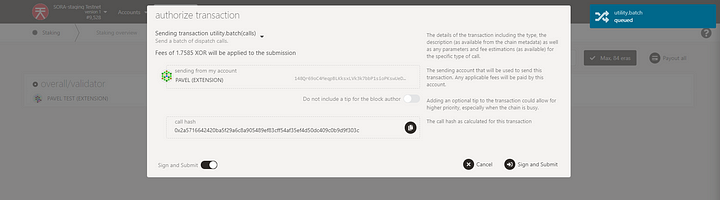
Sign the transaction.
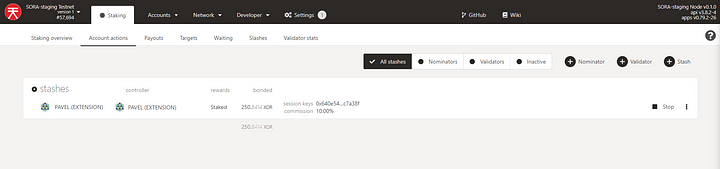
Make sure that you have been added to the stashes:
Finally, wait for the next Era.
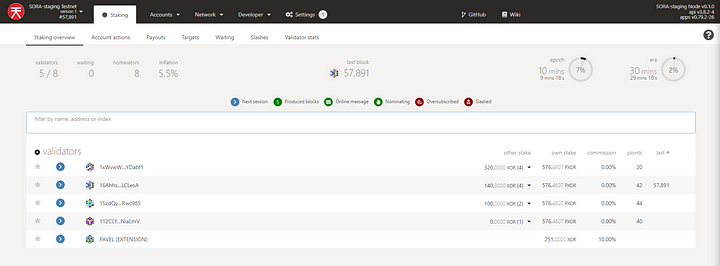
When the next Era starts, your validator will be added.
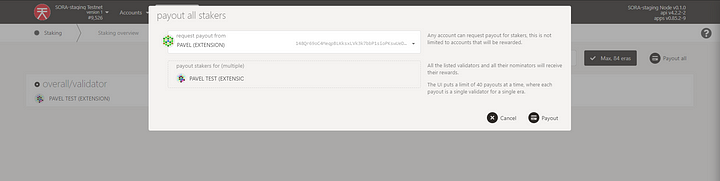
Get Payouts
Open Staking → Payouts. If your validator participates in the consensus, then you’ll be able to get payouts after the Era.
Polkadot.js apps always display XOR, because they don’t support multi assets. There should be said VAL on the screenshot below.
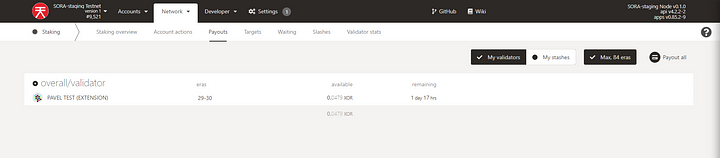
Click the Payout all button and sign the transaction
Make sure to pay attention as the reward will be shared among Validator and Nominators according the Stake.
Add node to Telemetry
If you want to add your node to telemetry just add this tag when you run the docker image
--telemetry-url "wss://telemetry.polkadot.io/submit/ 0"
You can change the name of your node by editing the parameter value of:
--name sora2-node
Running an Archive node
On Linux/Mac
Pull the docker image from the docker repository
bashdocker pull sora2/substrate:4.7.0Create a folder for the node configuration
bashmkdir sora2 cd sora2Grant access to the folder
bashchown 10000:10000 `pwd`WARNING
On macOS you might need to use this instead:
bashsudo chown <username>:1000Run the Docker command
bashdocker run --rm -p 127.0.0.1:9933:9933 -p 127.0.0.1:9944:9944 -v `pwd`:/chain sora2/substrate:4.7.0 --name sora2-my-node --chain main --base-path /chain --unsafe-ws-external --pruning archive --unsafe-rpc-external --wasm-execution compiled
On Windows
Pull the docker image from the docker repository
bashdocker pull sora2/substrate:4.7.0Create a folder for the node configuration:
C:\\Users\\<username>\\sora2-nodeCheck the access to the folder
All checkboxes should be activated for the user
Run the Docker command:
bashdocker run --rm -p 127.0.0.1:9933:9933 -p 127.0.0.1:9944:9944 -v sora2-node:/chain -u 0 sora2/substrate:4.7.0 --name sora2-my-node --chain main --base-path /chain --unsafe-ws-external --pruning archive --unsafe-rpc-external --wasm-execution compiled
The node will take some time to sync. The output in logs should look like this:
2021-04-30 11:33:33 💤 Idle (0 peers), best: #0 (0x7e4e…8ad5), finalized #0 (0x7e4e…8ad5), ⬇ 37.1kiB/s ⬆ 16.3kiB/s
2021-04-30 11:33:38 ⚙️  Syncing 31.0 bps, target=#38470 (1 peers), best: #155 (0xa9e2…5b22), finalized #0 (0x7e4e…8ad5), ⬇ 127.6kiB/s ⬆ 0.9kiB/s
2021-04-30 11:33:43 ⚙️  Syncing 35.6 bps, target=#38470 (2 peers), best: #333 (0x4c68…2957), finalized #0 (0x7e4e…8ad5), ⬇ 7.9kiB/s ⬆ 0.2kiB/s
2021-04-30 11:33:48 ⚙️  Syncing 32.4 bps, target=#38471 (2 peers), best: #495 (0x9082…f220), finalized #0 (0x7e4e…8ad5), ⬇ 41.3kiB/s ⬆ 1.1kiB/s
2021-04-30 11:33:53 ⚙️  Syncing 34.6 bps, target=#38471 (2 peers), best: #668 (0xb34a…121a), finalized #512 (0x1f6e…cc65), ⬇ 0.1kiB/s ⬆ 0
You can connect to your own node with Polkadot.js apps. Open Polkadot.js apps and navigate to the Development section in the network selector.
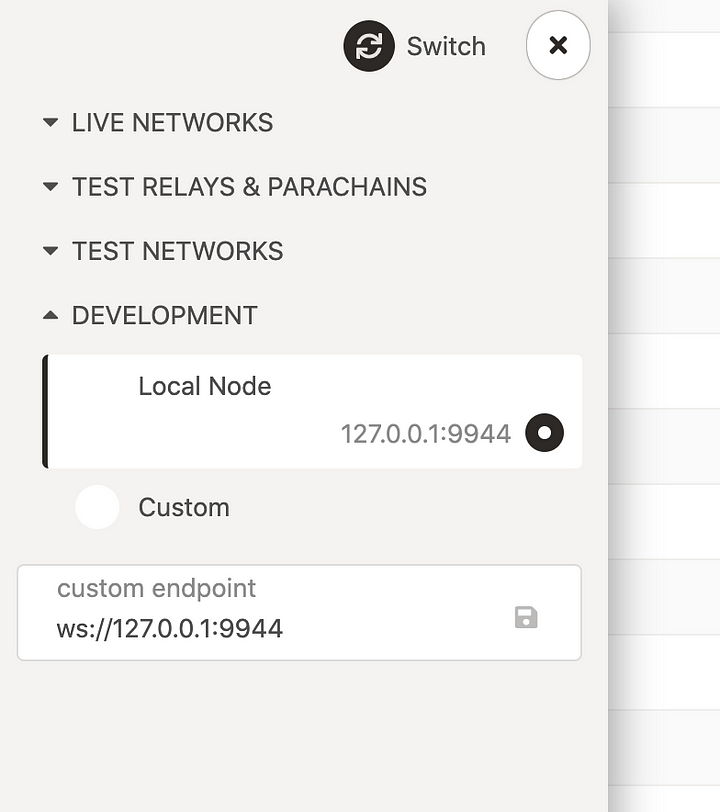
If you’re running a node on your local machine then select Local Node and click Switch. Otherwise, enter your custom endpoint and save.
FAQ
Q: I’m getting an error starting the node.
A: Double check if you have entered the command and flags correctly and that there are no typos. If that does not work,_ locate your sora2 folder, erase its contents, pull the docker image and try running the node again.
Q: I don’t have XOR for initial staking.
A: You can exchange tokens for XOR on Polkaswap, or transfer tokens from ETH to the SORA Mainnet using the bridge function in Polkaswap and then exchange for XOR.
Q: What is the minimum stake of XOR needed to run a node?
A: While no minimum amount is needed to run the node, the amount of stake required (between self-staking and nominations) to be in the active validator set will vary. You can look at the current amount staked on SORA nodes here
Q: Where can I see my node in telemetry?
A: You can see it here
Q: My node is having trouble syncing, what can I do?
A: You can add the setting --in-peers 80 and that should solve the issue, otherwise see the next question.
Q: I have checked all the documentation and my question still has no answer, who else can I ask?
A: You can always join the SORA Devs Telegram community and ask any other questions you may have there, other community members and the admins will be happy to help!
Q: I cannot access the local node from Polkadot.JS to get my session keys, what should I do?
A: Sometimes Polkadot.JS has trouble connecting to local nodes, in that case, we recommend you use the command line instructions to get your session keys.
Q: I see that the Docker version is higher than recommended in the guide. Which is the correct node version to use?
A: There are constant updates to the node version. However, it is not necessary to update your node to the latest version unless the developers specify it. In that case, it will be announced on SORA socials, and the node version will be updated in this article.